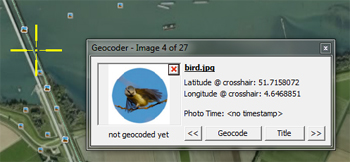
Photo GPS Extract is a tool to show the GPS location of a certain JPG photo. This article will describe how you can add the GPS data to a photo.
Adding GPS data to a photo is done in a process called 'Geotagging': you tag the picture with a geographic location. If you are lucky, you have a digital camera with an integrated GPS unit. These kind of cameras will automatically add the GPS coordinates to the pictures.
Unfortunately, not too many camera models have such GPS. There is better news for the smartphone users: many smartphones come with a GPS receiver and can therefore automatically add the GPS data.
Luckily there are some other ways to record the GPS data. Read more below!
First I would like to explain something about Exif (Exchangeable image file format): a digital picture is often stored in a JPEG file, a compressed format. The JPG file doesn't only contain the raw image data, it also contains some additional information about the photo. This information - metadata - is stored in a special portion of the file, called the 'Exif-header'.
The Exif is automatically generated by your camera at the moment the picture is taken. Basically the Exif is a list with properties: Each property has an assigned value: One of the properties could be the 'Camera Model', the assigned value could then be 'Nikon D50'.
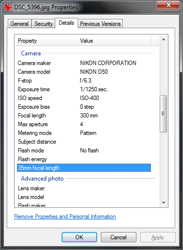
Windows allows you to view some of the Exif data in a photo= Just right-click any JPG file in Windows Explorer and click 'properties'. A window with several tab pages will now pop up. Here you can select the tab page 'Details' (see image at the left). This page contains some information from the Exif. It is important to realize this is only a small portion of the Exif-data. Some pictures can have over 100 Exif-properties. You need special software (like Exifer) to see all properties.
The number of used Exif-properties depend heavily on your camera model. Some of the most common fields are: camera manufacturer/model, date/time, image height/width, photographic properties (ISO sensitivity, shutter speed, aperture).
Cameras with a built-in GPS receiver will automatically add the GPS data to the Exif: latitude, longitude and elevation. The values are stored as numbers. Photo GPS Extract can read those numbers and visualize them on a Google Maps.
The Exif is writable, so it can be altered. If a picture doesn't have GPS coordinates, they can be added afterwards...
Last but not least I want to discuss a privacy issue: many people post photos to the Internet, to websites like Facebook. You should always consider the fact the Exif-header might contain data that shouldn't be made public (date, time and position). There are cases where this kind of information could be used against you. I usually remove all Exif-data before posting a picture to the social media.
First you should check if your camera has an integrated GPS unit. You can find this information in the specifications or the user manual. You should also check if the GPS module is enabled: On some cameras it will be disabled by default, because a GPS causes the batteries to discharge faster.
If your camera does have an enabled GPS module, it should record the GPS coordinates automatically. Be aware a GPS often has a poor reception when used indoor.
When you decide you want to start geotagging, you could buy a new camera. Luckily you don't necessarily need to do so. There are some other alternatives:
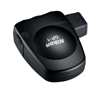
Some digital cameras have an input to connect an external GPS unit. For example: My Nikon D300 reflex camera can be connected to the optional Nikon GP-1 unit, by means of an external cable. With these kind of units, the GPS data is stored at the time a picture is taken.
This solution isn't possible for all digital cameras, it exists only the more expensive models (Nikon D90, D3, D300, D700, D2Xs, D200, D5000, D300s, D5100, D800, D4, D2, D7000, D3100, D800E) Such external GPS units can also be costly: The Nikon GP-1 costs about 150 euro's.
I wouldn't spend this kind of money on a GPS-unit: For the same money you can get a decent handheld GPS unit that can also be used for navigation purposes.
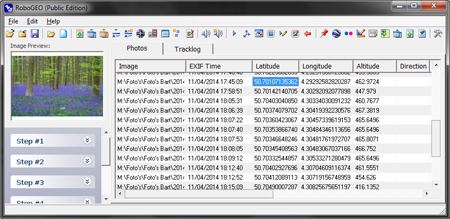
The easiest and cheapest solution is geotag your pictures manually: you set the coordinates yourself without the aid of a GPS unit. There is plenty of software that allows you to set the GPS coordinates automatically, like Google Picasa or RoboGEO. Both programs allow to use Google Earth to accurately select a certain geographic location. This location is then added to the pictures.
The disadvantages are obvious: you need to remember where each picture was taken. This is not an easy task after a 3-weeks trip where you took thousands of pictures. So, let's check a third option...
A more advanced solution is to geotag pictures by using a separate GPS tracklog file (GPX: GPS Exchange Format). The basic idea is you take a separate GPS device with you when taking pictures. This device needs to be capable to record to a tracklog: a file containing your positions, recorded with a certain time interval (like 10 seconds). This tracklog can be used to reconstruct your complete trip.
This GPS device doesn't need to be connected to your camera, so this solution can be used with every digital camera. There aren't too many requirements for the GPS device you use, it just needs to be able to record the track and export it as a GPX file to your computer. I myself use the discontinued Garmin Oregon 450t walking GPS, but there are also other possibilities:
The tricky part is to add the data from the tracklog into the JPG files: This is done using a special software tool. The tool will first read the date/time from each JPG file, and then search the tracklog file for the corresponding GPS location. The resulting location found will then be appended to the Exif header of the JPG.
The following image illustrates the whole process: the software will first read the date & time from the JPG file. Then it will lookup the GPX file for the corresponding coordinates. Software interpolation might be used in case the GPX doesn't contain the exact time.

I myself have very good experiences with this geotagging method, but the accuracy heavily depends on the used logging interval of the GPS unit. I recommend a logging interval of one minute or smaller. It is also very important to make sure the date & time settings of your camera are always right, or the geotagging software will determine an incorrect position!
RoboGEO
I use the RoboGEO software to do my automatic geotagging: It is a very affordable software and the author provides a very good support for it. The procedure is very simple:
Garmin Basecamp
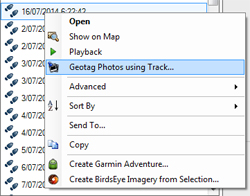
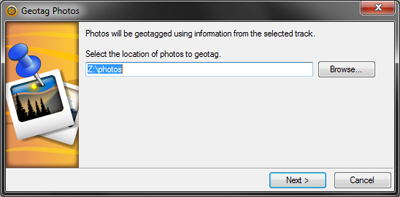
Garmin Basecamp is software that was designed with the Garmin GPS units. It can be used to read the data from your GPS, and to draw routes on a map. It has a lot of possibilities, amongst them there is a geotagging feature.